Lesson Activities
Lesson 1 - History of Electronic Music Activity
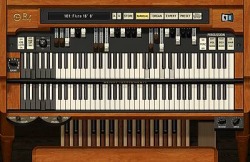
Experiment with the Hammond B3 Software. Download the free trial version of B4 1.1.0 software for Mac or Windows and follow installation instructions.
Continue With Lesson 1 - Musique Concrete
Lesson 1 - History of Electronic Music Activity 1A

Part 1: Go to VintageSynth.com and audition the various types of vintage synthesizers. Models can be selected from the navigation menu on the left of the website.
Post the link to your favorite synth in the forum and include down 3 reasons why you selected it.
Part 2: Click on the Interview With Bob Moog link at the bottom of the Most Recent Developments page of our website. Select the Part 12 video and listen to what Bob Moog says about the next evolution of synthesis. You can also access the Interview With Bob Moog video directly.
Continue With Lesson 1 Quiz
Lesson 2 Activity
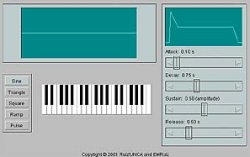
Go To: Sound Applets Website
Select The "Simple Synthesizer" At The Bottom
Experiment With The Waveforms and ADSR Module
Complete Lesson 2 Workbook Assignment
Lesson 2A - ADSR and Vintage Synths Activity
Part 1: Go To: Arturia.com then download and audition one of the vintage synth software demos.
Experiment with the synth by changing the ADSR envelopes on the patches (sounds)
Part 2: Go to http://www.muxicall.com/ and explore artistic concepts in sound related with the phenomenon of collective composition and improvisation. This site is a great way to experience Newton and the color spectrum that associate each color of the visible light spectrum to one particular note based on its frequencies.
Lesson 3 Activity - Software Evaluation
Project: Work with the following programs and rate them on a scale from 1 to 10 on Ease of Use, User Interface, Features (What you liked best & least, what would you change):
-Music Notation
-Sequencing Software
-Music Education Software/Theory
-Intelligent Software
Download and use the evaluation form below to complete the activity.
| computer_applications_in_music.doc |
| notationproject002.pdf |
Lesson 4 MIDI Activity

Finding and Manipulating MIDI File (SMFs)
1. Search the web at http://cool-midi.com or www.classicalarchives.com for a MIDI file.
2. Audition MIDI files
3. Download your favorite (Click the mouse while holding down the option key)
4. Open Garage Band
5. Import the MIDI file into a track
6. Change the instruments used to play the tracks.
7. Select instruments that would have been used by the composer or create a modern version of the piece with newer instrumentation.
8. Add MIDI tracks to change the style or feel of the piece
9. Mix the volumes of each track and add volume changes throughout the piece producing your own arrangement.
10. Save and then export as an mp3 file to your desktop/folder. If exported as a .wav file you will need to convert it to an mp3 file using iTunes or equivalent before uploading to divshare and posting on your website.
11. Upload your mp3 file to your divshare.com account and then post it on your website by embedding it. See the "Tutorials" section for a video on how to do this.
Lesson 4A MIDI Activity
Create Your Own Drum Loop
Using Garage Band or equivalent sequencing program record your own drum loop using MIDI Software Rhythm Instruments Only.
Loop will be 8 measures in length.
Approximately 4-6 tracks. You may "overdub" your first drum track to include all of the parts if your sequencer has this option.
Be sure to "Quantize" each track as you record it so that all of your parts are in time.
Select the appropriate tempo and time signature for your drum loop.
Using your metronome record the tracks in the following order:
1. Bass/kick drum. Then quantize track.
2. Snare drum. Then quantize track.
3. Cymbals/Hi Hat. Then quantize track.
4. Other percussion. Then quantize track.
5. Other percussion. Then quantize track.
6. Other percussion. Then quantize track.
Once you have completed your drum loop, export it and upload it to your electronic portfolio on your website following the same steps #10 and #11 as in the previous Lesson 4 activity.
Return to Lesson 4 And Continue with MIDI Workbook Assignment
